Hello fluffies! I am going to share some of my photo editing secrets with you guys as I have been getting a ton of questions on how I get the dreamy, vintage look to my pictures. All my pictures are usually edited in Photoshop, but getting around the tools in Photoshop can be a tad daunting if you are not into multiple controls and options just to achieve a high end look to your photos.
I was a total zero with editing when I first started this blog as you will probably notice in my earlier posts and video tutorials, however, I was lucky enough to stumble upon an online editing tool that offered amazing filters, editing options and tools without it being confusing. Perfect for a noobie like me! Before I got around using Photoshop, PicMonkey was my go to photo editing tool and I thought I would share this with those of you who want quick and seamless photos with that vintage, dreamy touch.
PicMonkey has a free and paid option, however, I highly recommend the free plan if you are in and out for a quick edit. Almost 75% of PicMonkey's features are free, so that is definitely a plus for those of you who are not photo editing maniacs like I am. I however, opted for the paid plan because I found it really cheap and I daresay it is
almost as good as Photoshop.
Paid plan:
4.99USD a month
33USD a year
Alright dudes, now on to the tutorial. I am going to show you how to achieve my signature vintage, dreamy look I always use for my photos. Although I do them now on Photoshop (thanks to hours and almost 10 months of practice), I always come back to PicMonkey for quick little touch ups. This tutorial will be done solely on PicMonkey alone. If you would like a tutorial on how I achieve my
fashion or
craft images in Photoshop, let me know in the comments below and I will cook something up for you guys.
Note: Left click on screenshots to enlarge.
STEP 1: UPLOAD A PICTURE ON PICMONKEY
This is a screenshot of the front page of PicMonkey, before editing a picture, you will need to upload one. No registration is needed for free users, all you need to do is upload your selected photo by clicking on the 'EDIT PHOTO' button as seen on the screenshot above.
Go to PicMonkey
STEP 2: GETTING TO KNOW FUNCTIONS
Once you have uploaded a picture, it will automatically take you to this page. As you can see the right pane is the picture we will be editing today, and the left pane is your function bar. Below is the list of editing options available starting from top to bottom.
1) Basic editing tools (ie: image cropping, rotation, exposure, colors, resizing)
2) Filters, effects, and advanced editing tools (this is the magic that is PicMonkey)
3) Image touch up tools (used mainly for self portraits. There are tools to whiten teeth, remove blemishes on the face and so forth)
4) Fonts ( a huge variety of them. This, I use all the time)
5) Fun Overlays (cute little icons, emoticons, banners, doodles)
6) Frames
7) Textures (Upload your own textures, or use ready made ones from bokehs, to clouds, you decide)
8) New effects, textures, overlays arranged according to season, plus, new effects
STEP 3: ADJUST CURVES IN EFFECTS WINDOW
Click on the second icon on your left pane as shown above. Now gloat at the effects. I only have half of them shown here, if you log in, you will see an array of cute thingimajigies to play with.
Scroll down to Curves and click. It is categorized under 'Advanced ' in your effects window.
I am going to adjust the curves by giving more shadow to the dark areas and more light to the highlights of this picture. Drag the left side of the line downwards to create shadow and the right upper side of the line to create more light. You should have a wavy 'S' shape as seen in the screen shot. You can reduce the curve effects by tweaking the 'Fade' button, but I am going to leave it as it is.
STEP 4: FUN PART! PHOTO FILTERS!
Once you are done with curves, scroll up till you find a filter named 'Tranquil'. This filter gives a bluish, pinkish tint to your pictures. As always, you can adjust the strength of this filter using the 'Fade'slider. You are also able to manually brush only specific areas using the ' Paint' option as seen in the screen shot.
Once you are done with the 'Tranquil' filter, scroll up to the 'Rapture' filter and click on that. Apply it to your picture. I faded this filter to about 67% as seen in the screenshot.
STEP 5: ADD GLOW EFFECT
This effect is optional, but I love that dreamy, fantasy like effect 'Sunglow' has when applied to a picture. This works especially well with landscapes. Now lets scroll down to the 'Sunglow' effect. Once you click on it, you will see something like in the screenshot above. Use your mouse and drag to move this effect to any part of your picture. I am going to put this somewhere on the top left and reduce the glow size to about 50% and fade it out to about 51%.
STEP 6: REDUCING CONTRAST
Lets achieve the effect in the screenshot above. Once you add glow, you are now going to click on the first option in your left pane as shown above. When you get there, scroll down to the 'Exposure' option and click. You will see a drop down menu. Go down to 'Contrast' and reduce it. I am reducing the contrast to a -14 to mute the glow and colors on this picture. This will create the dreamy muted vintage effect.
In photoshop, I usually achieve this using multiple layers.
STEP 7: TEXTURES
We are now going to give this picture a story and a sprinkle of fairy dust for that magical feeling. Now lets head to your left pane again. Choose the second last option which will bring you to 'Textures'. You can use the ready made ones like you see in the screen shot above, but I am going to upload my own. To upload your own texture, click on the 'Your Own' option, and you will see a window drop down like the above. Click on 'Open my texture'and upload something from your computer. I will include my textures for download below. Once you upload your texture, go to 'Blend mode' ( see above) and choose the 'Lighten' option. You can fade this out if you want. I used two textures for this picture, using the the same method.
FINAL STEP: ADD VIGNETTE
Once the second texture is added, you are now able to see little sparkly things that creates such a pretty picture. Alright, final step. Lets darken the edges in this picture to give it that vintage, old school look. Back to your left pane again and click on your second icon, the 'Effects' option. Scroll down till you find 'Spotlight'. Click on that and adjust the fade to about 46%-48%. You are now finished!
Remember that these effects can be adjusted according to your picture. If you feel a little adventurous, try your own combination of effects and send me a picture! I would love to see your little vintage creations.
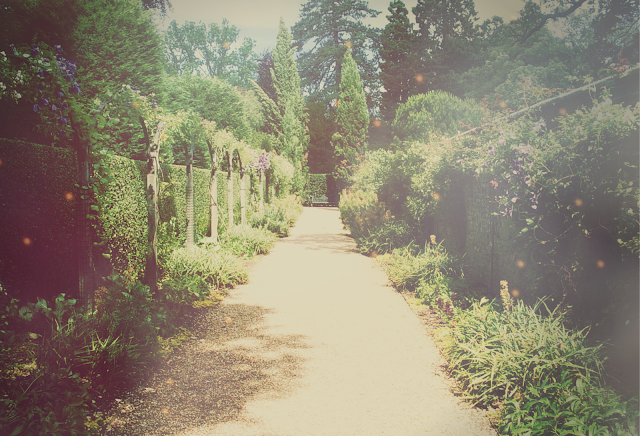
Below is a before and after of the picture we edited today. I hope you enjoyed this tiny tutorial and have a great weekend people of the internet!
BEFORE
AFTER
 Disclaimer: This image does not belong to me.


.png)
.png)
.png)
.png)
.png)


.png)


Hi Aiko :3
ReplyDeleteJust discovered your blog and it´s the cutest thing I´ve ever seen!
Had a look through your outfit posts and your style is so cute and unique ^^
Wow I really like this tutorial, thanks so much!!
ReplyDeletethank you so much!! i am glad you found this helpful ! HUGS
Deletecan you make a video/blog how you put picture from pc to instagm please.... i'm looking on youtube but none work for me....... =,( ...anyway thankyou for this tutorial..it help me a lot!! i really suck with photoshop =)
ReplyDelete